When I started my Photography hobby, I had no idea how to organize my Photos. I used Adobe Photoshop extensively, but my photos were scattered everywhere, on my laptop, on my hard drives... Although I organize them by date or by Subject, it was so hard to find a photo I needed.
In one photo shoot session, I usually shoot 100s of shots, in order to finally accept a few. So had Folders within folders, that contained the Picks of each shoot!
Adobe Lightroom came to my rescue. It allowed me to organize my photos into Catalogs, and sort, tag, and pick or unpick photos within a collection or a shoot. Never worried again about the location of the Photos, as Lightroom will always find the image I am looking for.
One of the biggest improvement Lightroom brought to me is the ability to Keyword my images. If I wanted to look for images I shot in the desert with camels, all I have to do is simply filter my catalog to these keywords, and boom. I get them!
Among the other amazing features is the Develop module, which allowed me to quickly fix my photos, and use some really advanced tools. But the most amazing tool of all, is the Adjustment Brush Tool in Lightroom, it holds a small secret feature that is a jewel to all photographers, especially Portrait Photographers: The "Soften Skin" Feature.
I wanted to share this with you and how you can easily soften Skin using simple steps otherwise requiring a lot of work and knowledge inside Adobe Photoshop.
1. Select your Model Photo, and click on the Develop Module, then click on the Adjustment Brush tool:
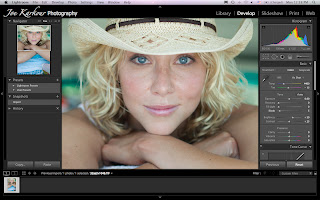

2. From the Drop Down Menu Choose: Soften Skin

3. Paint on the Model's face and watch how Lightroom softens the Skin and maintains a perfect Skin Tone & protects other Details
BEFORE:

AFTER

I love this features, it saves me a lot of time!
Stay in touch!