Adobe Creative Cloud? ما هو ال
Monday, September 9, 2013
Over 150 new features announced for Adobe Video solutions!
Premiere Pro CCAfterEffects CC
SpeedGrade CC
Prelude CC
http://success.adobe.com/en/na/programs/events/1309_39968_ibc.html
Thursday, June 20, 2013
Adobe Creative Cloud Available In the Middle East!
How to Install Arabic Enabled Apps on your Machine?
So, finally we are excited to see Adobe Creative Cloud Launch in the Middle East. Now you can purchase a 1 year Subscription for as low as 39.99 USD per month only (promo till end of August 2013), and download all Adobe Apps & Much more... See more information on Adobe Creative Cloud here
One of the many advantages of Creative Cloud, is that you can download your favourite Adobe Applications, (like Adobe Photoshop, or Lightroom) in any Language you want, and for Mac or Windows platforms.
How to Install the Arabic Enabled Application?
Once you subscribe to Adobe Creative Cloud, you are presented with the Creative Cloud Login Page.

Sign in with your Adobe ID & Password, and you will go directly to the Download Centre. This is where you will be able to download one or All Adobe Applications to your machine.

Example: To download Adobe Photoshop CC, click on the Adobe Photoshop Download Link, you will be presented with a Download Window:

You can check what languages are supported by this particular App, and you can see that Adobe Photoshop CC supports Right To Left Arabic text.

Once you click on the Download button for the first time, Adobe Creative Cloud will install the Adobe Creative Cloud Desktop Tool, which will allow you to manage your Creative Cloud Membership, Download Applications, Synchronise your Cloud Files, and other features.
To select the preferred language support for all your Apps, click on the Settings Icon, and choose Preferences...

Click on the Apps Tab, and choose the App Language Preference for your Applications to download. In this case, we will choose English with Arabic Support (English يدعم العربية ).

Now you are ready to install your favourite Adobe Applications on your machine with Arabic/English support.
تحياتي!
Friday, March 29, 2013
Using AXT Legacy Arabic Fonts inside InDesign CS6 - Middle East Version
So, I was asked many times why people are sometimes not able to use certain Legacy Arabic Fonts inside InDesign CS6 ME version, mainly AXT fonts.
First of all, make sure that you are using the "Middle East Version of InDesign CS6"


Problem Definition
So, what happens when you type or select Arabic text, and try to use an AXT legacy Arabic font like "AXt-Manal"?
First you will receive a message that informs you that "Missing Glyph Protection has occurred...", and then nothing happens, as you cannot use the AXT font.

In order to fix this problem, you will need to go to the InDesign Advanced Type Preferences, and turn off missing Glyph Protection options.
Select: InDesign -> Preferences -> Advanced Type

Turn off: "Protect While Typing, and Protect While Applying Fonts"

After you have done this, you can now use AXT Legacy fonts and apply them to Selected Fonts.

Good Luck
So, I was asked many times why people are sometimes not able to use certain Legacy Arabic Fonts inside InDesign CS6 ME version, mainly AXT fonts.
First of all, make sure that you are using the "Middle East Version of InDesign CS6"
Problem Definition
So, what happens when you type or select Arabic text, and try to use an AXT legacy Arabic font like "AXt-Manal"?
First you will receive a message that informs you that "Missing Glyph Protection has occurred...", and then nothing happens, as you cannot use the AXT font.
In order to fix this problem, you will need to go to the InDesign Advanced Type Preferences, and turn off missing Glyph Protection options.
Select: InDesign -> Preferences -> Advanced Type
Turn off: "Protect While Typing, and Protect While Applying Fonts"
After you have done this, you can now use AXT Legacy fonts and apply them to Selected Fonts.
Good Luck
Friday, June 1, 2012
InDesign CS6 Middle East Version - Features Sneak Peak - Part 1
Here is a Sneak Peak Video on how Adobe InDesign CS6 Middle East Version supports the Arabic Language.
Enjoy!
Monday, March 26, 2012
Adobe Photoshop CS6 Beta - Iris Blur
Well, like many Photography enthusiasts in this world, I was so exited to download the new Adobe Photoshop CS6 Beta released a few days ago at the Adobe Labs.
In this Blog, I would like to cover an amazing new feature that will bring a new dimension to the word “Depth of Field” in Photography.
Note: You can click on any screenshot below to view it in full resolution.
What is Depth of Field in Photography?
Simply put, the depth of field in photography (DOF) is the distance between the nearest and the farthest object in a scene that appear similarly in focus or sharp. Optical lenses can focus on one distance at a time, so depending on your Focus point, the sharpness decreases as you go farther or closer from the Focus point. The sharpness decrease can be adjusted to minimal (barely noticeable) by using a Smaller Apertures, or very noticeable by using Bigger Apertures creating more emphasis on a certain object and blurring for example other objects in the scene.
Professional Photographers know very well how to control their Depth of Field by using specific f-number stops for larger or smaller DOFs as required by the shoot. However, f-number stops are limited, and largely depend on the quality of the lens being used. The larger the DOF, the more expensive the lens! Not to mention some scene limitations where you are required to have a bigger f-number stop due to some lighting limitations, and therefore don't have total control over your Depth of Field.
In our example, I was shooting a Coffee Cup scene, and I wanted a Sharp Coffee Cup in the foreground, and setup a blurry background (out of Focus) in which I installed some nice juicy Croissants, and coffee beans spread on the table to create an nice Ambiance and open the appetite of the viewer.
Before

After

Creating Custom Depth of Fields
Using an 85mm fixed lens with an aperture setting at 1.8f allowed me to capture a great image with a somewhat acceptable Depth of Field, creating a nice Sharp Coffee Cup in the foreground, and an out-of-focus (blurry) background. But, I wanted MORE. More Blur in the background, and I wanted to control where and what is blurred.
Adobe Photoshop CS6 to the Rescue.
Adobe introduced an amazing new filter called Iris Blur. Iris Blur will allow us to achieve amazing Depth Of Field results that are sometimes almost impossible to achieve photographically.
First, I Choose “Filter->Blur->Iris Blur”.
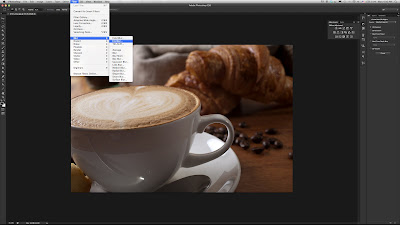
On Image controls are displayed over the image. First I drag the central blur pin to the middle of the Coffee Cup, as to indicate my Sharp Area.
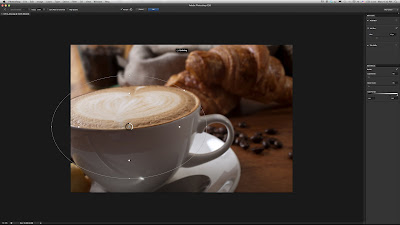
Then I adjust the shape and roundness of the area by dragging in or out the handles of the boundary edge.

Then I can adjust the Sharp Area using the Inner Pins, and I love how I am able to do all of this on the image, and not in some cumbersome dialogue box, this is mainly due to the fact that Photoshop CS6 is using the Adobe’s new Mercury Graphics Engine (read more about Adobe’s Mercury Graphics Engine Here), making much easier to to use and more efficient results.
You can also adjust individual inner pins by holding down the Option (mac), Alt (PC) keys.
Once I like the shape and settings of my Iris Blur, I can turn the center blur controls higher to create a really strong blur effect to my background, and keep my Coffee Cup Sharp and in-focus.

and Voila!
This kind of work used to take so much time to achieve with older versions of Photoshop, having to use masks, and blur effects that are not so easy to manage and control.
Photography will never be the same again...
In this Blog, I would like to cover an amazing new feature that will bring a new dimension to the word “Depth of Field” in Photography.
Note: You can click on any screenshot below to view it in full resolution.
What is Depth of Field in Photography?
Simply put, the depth of field in photography (DOF) is the distance between the nearest and the farthest object in a scene that appear similarly in focus or sharp. Optical lenses can focus on one distance at a time, so depending on your Focus point, the sharpness decreases as you go farther or closer from the Focus point. The sharpness decrease can be adjusted to minimal (barely noticeable) by using a Smaller Apertures, or very noticeable by using Bigger Apertures creating more emphasis on a certain object and blurring for example other objects in the scene.
Professional Photographers know very well how to control their Depth of Field by using specific f-number stops for larger or smaller DOFs as required by the shoot. However, f-number stops are limited, and largely depend on the quality of the lens being used. The larger the DOF, the more expensive the lens! Not to mention some scene limitations where you are required to have a bigger f-number stop due to some lighting limitations, and therefore don't have total control over your Depth of Field.
In our example, I was shooting a Coffee Cup scene, and I wanted a Sharp Coffee Cup in the foreground, and setup a blurry background (out of Focus) in which I installed some nice juicy Croissants, and coffee beans spread on the table to create an nice Ambiance and open the appetite of the viewer.
Before

After
Creating Custom Depth of Fields
Using an 85mm fixed lens with an aperture setting at 1.8f allowed me to capture a great image with a somewhat acceptable Depth of Field, creating a nice Sharp Coffee Cup in the foreground, and an out-of-focus (blurry) background. But, I wanted MORE. More Blur in the background, and I wanted to control where and what is blurred.
Adobe Photoshop CS6 to the Rescue.
Adobe introduced an amazing new filter called Iris Blur. Iris Blur will allow us to achieve amazing Depth Of Field results that are sometimes almost impossible to achieve photographically.
First, I Choose “Filter->Blur->Iris Blur”.

On Image controls are displayed over the image. First I drag the central blur pin to the middle of the Coffee Cup, as to indicate my Sharp Area.

Then I adjust the shape and roundness of the area by dragging in or out the handles of the boundary edge.

Then I can adjust the Sharp Area using the Inner Pins, and I love how I am able to do all of this on the image, and not in some cumbersome dialogue box, this is mainly due to the fact that Photoshop CS6 is using the Adobe’s new Mercury Graphics Engine (read more about Adobe’s Mercury Graphics Engine Here), making much easier to to use and more efficient results.
You can also adjust individual inner pins by holding down the Option (mac), Alt (PC) keys.
Once I like the shape and settings of my Iris Blur, I can turn the center blur controls higher to create a really strong blur effect to my background, and keep my Coffee Cup Sharp and in-focus.

and Voila!
This kind of work used to take so much time to achieve with older versions of Photoshop, having to use masks, and blur effects that are not so easy to manage and control.
Photography will never be the same again...
Tuesday, March 13, 2012
Arabic Panels inside InDesign & Photoshop CS5

In this Post I would like to show you how you can easily create custom-designed Panels for use in Photoshop and InDesign. These panels could be for example some of the most commonly used commands in Photoshop translated to Arabic, that you can design and provide your colleagues.

For this, I use Adobe Configurator 2.0™, which is a free utility from Adobe Systems. You can download it from:
http://labs.adobe.com/downloads/configurator.html
Once you download it, launch the App and select "Create Panel", then choose the Product you wish to create the Panel for. You can choose to create for Photoshop or for InDesign. Choose for example Photoshop and start creating your own custom panel.
You can drag and drop commands from the left side bar to your Panel, and change the Name of the Buttons to anything you want. In our example, I am changing the names to Arabic. All you have to do is switch to the Arabic Keyboard and type the Arabic Translation you want in the "Label" field on the right side panel.


Keep designing your panel with all the widely used commands that you want to have access to quickly through your panel.
In the Basic Attributes Field on the Right, give your Panel a name. For example "Arabic Panel".
Once you are ready, you can generate the panel and install it into your Photoshop Application as follows:
From the File Menu choose: Export Panel

Export your Panel to the following Location:
/Applications/Adobe Photoshop CS5/Plug-ins/Panels/ (Mac OS)
C:\Program Files\Adobe\Adobe Photoshop CS5\Plug-ins\Panels (Windows XP)
C:\Program Files\Adobe\Adobe Photoshop CS5 (64 Bit)\Plug-ins\Panels (Windows 64 Bit)
How to Open the Panel From Photoshop CS5
Launch Photoshop, and choose "Window->Extensions->Your Panel name"
and enjoy!
If you would like to get a free copy of the Arabic Panel that I created in this example, email me to:
jkarkour@adobe.com, and I will send you the Panel.
Thanks you
Subscribe to:
Posts (Atom)